Showing posts with label halloween. Show all posts

Monday, October 22, 2012

spatter up.

Dexter nails!!! 
I didn't come up with this 'technique' but I did it &
 I would say that any skill level can handle this. It's literally painting your nails white
and spitting/blowing paint onto them with a regular straw. 


Check out the full spatter tutorial on 


Btw... I'm still disturbed by the fact that the strip club dicks made the sweet bartender 
who loved his family kill himself last night. Not cool.

Wednesday, October 17, 2012

diy. skelly nails.

skelly nails.

Supplies:
(found mine on ebay)
Photoshop & Printer
Scissors
Base Color & Top Coat


Here is a screen shot of my print out, but I can share the hi-res file with you
if you ask me nicely.

I've done this twice now, once on a laser jet & once on an inkjet. So far I had the best luck on the laser jet and got a lot of smearing from the inkjet printer. However, for my halloween nails the smearing actually made is look more ghostly, so it worked out. 
I will look into this in the future.

Mini designs.


1. Once you have your print out, cut out your little designs. 
2. Literally apply it exactly as you would a temporary tattoo to your skin.  
3. Design, face down on the nail bed.
4. Sopping wet paper towel or sponge directly on top for approx 15-30 seconds.
5. Lift paper off carefully and the design will have transfered.

After I have applied the sponge.

After the paper was lifted off. All that's left if the top coat, which
can you be done immediately.


Other Inspirations.


high brow halloween.

Skeleton costume/wardrobe pieces that you will certainly wear again.  
Here are some key pieces that just might be worth their price tag.


Jeremy Scott Runway


Monday, October 24, 2011

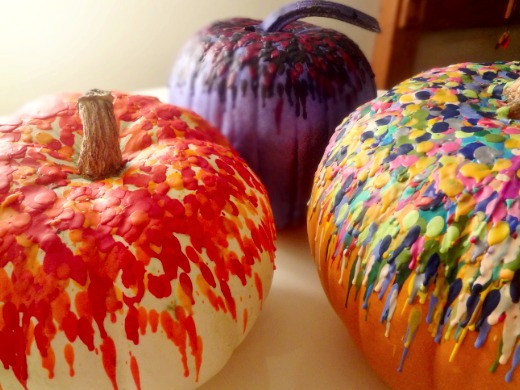
DIY. crayon drip pumpkins.

Originally posted on The Swede Records


My DIY version :)  
Once I started using a blow torch, things moved really quickly. 
Just don't burn yourself. Don't hold the crayon with your hand if you are using a torch.
I crafted a crayon holder out of a thick piece of wire. Have fun!!!


Thursday, October 20, 2011

handmade halloween. DIY.


Handmade Halloween Cards.

All supplies purchased from Micheal's craft store.
Just remember that envelopes will likely be needed,
so keep that in mind when deciding on the size of the card,
or else you will be making your own envelopes.

work space.


martha stewart crafts.


halloween ribbon. not the actual ribbon i used, but very similar.

Supplies:
water color paper or heavy card stock in a neutral color
scrap booking paper in festive patterns/colors (orange, black, etc)
or Martha Stewart Crafts Halloween mat pad (pictured above)
halloween appropriate ribbon ($1 spools from Michael's crafts)
stickers, buttons, felt shapes, letters, etc.
hot glue gun, scissors, packaging tape

Direction:
start off with your water color paper, or card stock.
fold it in half, creating a card.
mix and match papers & patterns, ribbons & buttons and stickers & letters

I mostly used the packing tape to secure the ribbon to the backside of the scrapbook paper... then hot glued the scrap book paper to the card stock to hide the edges.
but there really is no wrong way to do it. get crazy. it's halloween!!!


This ones not handmade, but equally as adorable.
I got this from Target.

The inside says:
"So many door bells, so little time!"