Showing posts with label crafts. Show all posts

Sunday, August 11, 2013

diy doughnut sweater.


enjoying a peach yeast doughnut at the doughnut plant on grand & essex today, 
contrary to my lackluster expression - it was AMAZING!!! 

supplies:
1 grey sweater/sweatshirt
(mine cashmere blend from uniqlo for $30)
1 standard piece of felt - pastel pink
various round objects to trace circumference 
safety pins for placement
an assortment of tube beads, sequins and seed beads
1 bead needle, 1 embroider needle
1 white skein of embroidery floss

i just learned the definition of the word skien***
A length of thread or yarn wound in a loose long coil
those wrapped colors of embroidery floss are indeed called skeins


MORE AFTER THE JUMP

Tuesday, February 19, 2013

doodle stitching.

Wishfully thinking I will have time to start doodle stitching. This book is seriously adorable.  I'm just waiting for my next wedding invitation to arrive in my mailbox so I can get started on a set of monogrammed tea towels.


I'll be sure to post anything I get around too.

Thursday, January 26, 2012

DIY. paint swatch valentines.

BEHR Premium Plus paint swatches from Home Depot are fantastic!  Because...
they are larger (6" long & 5" wide) then standard paint swatches which means that
there are so many more possibilities for re-use or up-cycling!  

Below are more samples of the quality swatches BEHR carries.
If you don't already know this... they're free (within reason).
I make it a point to grab a handful each time I hit up Home Depot, 
in the off-chance that I will find a use for them.


Supplies:
BEHR paint swatches
A2 4 3/8" X 5 3/4" size envelopes ( I got mine from BLICK)
rubber cement, scissors
heart hole punch
scrapbooking paper, notebook paper, doilies etc.
valentine sticker assortment
rubber alphabet stamps & ink
hot glue gun
safety pin
embroidery needle & floss
buttons

To create the card:
Step 1: take your color swatch and fold down 1/3 creating a flap
Step 2: to back the inside - lay swatch over scrapbooking paper to create a guide & cut to size
(I cut mine into 2 slices making it easier to bend so it's less bulky in the crease)
Step 3: paint thin layer of rubber cement on the back side of both surfaces
Step 4: blow on the adhesive until it's tacky, then press surfaces together to create a bond
Step 5: roll off excess glue with your finger tips

Decorate your love notes!

I used a heart hole punch that I got from BLICK for $6. great investment!
Also used some card board scrapbooking stickers from Michaels.
Notebook paper (tends to not be opaque so I added another page to back it before attaching)
Doilies (use just a touch of hot glue on this, tricky because of all the holes)
If you are using heavy or bulky things, add a dab of hot glue to reinforce them
(even if there is already adhesive).

To make the button closure:
Step 1: take the card & a button and visually place the button on the top flap
Step 2: use your safety pin to poke holes through the paper for a guide
Step 3: sew on the button with embroidery floss
Step 4: use your safety pin again, to create a hole through the back of the card
Step 5: knot a piece of embroidery floss and feed it through the back
making sure the placement is relative to the top flap button.  
leave the thread open ended to wind around the button on the top flap...
And you're done!

Easy, resourceful, creative & fun!


Monday, October 24, 2011

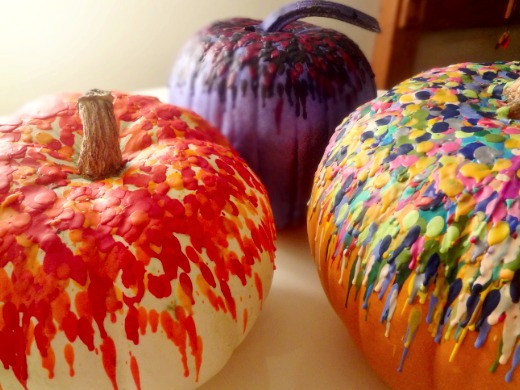
DIY. crayon drip pumpkins.

Originally posted on The Swede Records


My DIY version :)  
Once I started using a blow torch, things moved really quickly. 
Just don't burn yourself. Don't hold the crayon with your hand if you are using a torch.
I crafted a crayon holder out of a thick piece of wire. Have fun!!!


Thursday, October 20, 2011

handmade halloween. DIY.


Handmade Halloween Cards.

All supplies purchased from Micheal's craft store.
Just remember that envelopes will likely be needed,
so keep that in mind when deciding on the size of the card,
or else you will be making your own envelopes.

work space.


martha stewart crafts.


halloween ribbon. not the actual ribbon i used, but very similar.

Supplies:
water color paper or heavy card stock in a neutral color
scrap booking paper in festive patterns/colors (orange, black, etc)
or Martha Stewart Crafts Halloween mat pad (pictured above)
halloween appropriate ribbon ($1 spools from Michael's crafts)
stickers, buttons, felt shapes, letters, etc.
hot glue gun, scissors, packaging tape

Direction:
start off with your water color paper, or card stock.
fold it in half, creating a card.
mix and match papers & patterns, ribbons & buttons and stickers & letters

I mostly used the packing tape to secure the ribbon to the backside of the scrapbook paper... then hot glued the scrap book paper to the card stock to hide the edges.
but there really is no wrong way to do it. get crazy. it's halloween!!!


This ones not handmade, but equally as adorable.
I got this from Target.

The inside says:
"So many door bells, so little time!"